New machine

Do you remember when I was wondering whether to buy a new machine or not few weeks back? Well, she is here!!

But first, a big thank you for all the comments I receive on this post. It really helps to receive helpful feedbacks. I love this online quilting community so much, you guys are so supportive (special thanks to Carla, JudyEsther, Bria and of course Yvonne).

Let me present you the new addition to our home: the Janome DC6030.

IMG_8907

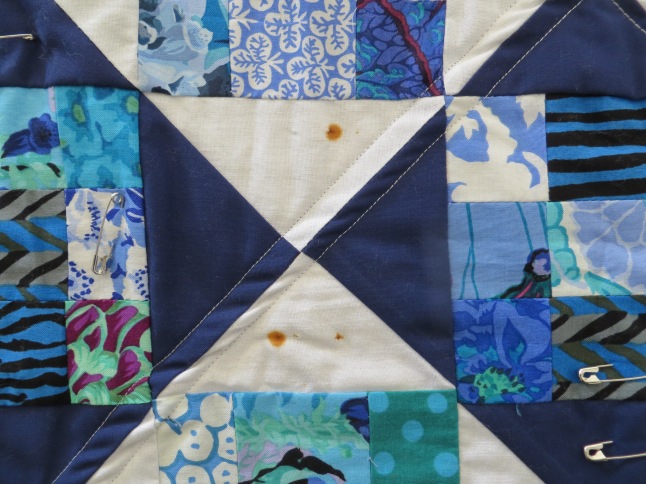
She came with a hard cover, an extension table (very handy) and several feet (unfortunately NOT a walking foot nor a darning foot). I spent my first week-end sewing with my new toy and made the Meadow brick quilt top.

It was a real pleasure to sew with this machine. Let me tell you what changed my life and what I particularly love about it:

photo 1

A big cheer up to the scissor button!! I used to use my little snippy thread cutter every minute but not any more. I actually hardly touched it this time. I also like the “Needle up/Needle down” option and “locking stitch”. It makes such a neat locking stitch as oppose to my ugly manual reverse. I was slightly scared to go for a computerised machine as I only use mechanic, but there is really no reason to be scare at all. This is like nights and days!

photo 2

The next feature I love is the drop down bobbin. It is way easier to insert your bobbin, you don’t need to bring your thread up AND you can see if you are running low in thread. Brilliant!photo 3

I could go on all night about my new machine but decided to stop to three lovely features. So, last but definitely not least, I love the stitch selector and the screen. It’s probably a nice way to jump from mechanical to computerised as you still have buttons to click. Despite having a limited number of stitches (30), I prefer being able to visualise them and quickly select the one I need. Everything is so easy to select. The arrows are for stitch width and stitch length (easy peasy).

I know these are basic features for computerised machines, but coming from manual machines, it is definitely changing my sewing life. If you are looking to change machine and only used mechanical machine, do not hesitate a second to purchase a computerised, it will feel like magic to you.

I can’t wait to create more and more projects with this beauty.

Linking up with:

molli_sparkles_sunday_stash_button

XOXO WIP

I thought I would give you a little update on XOXO quillt for WIP Wednesday. We had a little get together sewing day with local girls on Sunday and I did some great progress on that quilt top.

I managed to finish all my letters and, by the end of the day, I was trying to find a layout. I must say that it is quite tricky to find a layout when picking the colours wasn’t part of the design process. All I did was using all my pink fabrics from my stash. And when I say “all my pink”, I really mean every single print or solid I own in pink.

IMG_8906

I’m a big fan of buying and sewing new designer’s fabric collections. But I also like the feel from a random patchwork with random fabrics. To me, I feel closer to the people who were doing patchwork in the first place. They were not planing on specific fabric designs but used what they had on hand. Doing a random patchwork makes me feel part of this line of quilters.

Arangements

The girls from the get together helped me to find a layout. Are you willing to help too? Which option would you prefer? What letters would you switch?

xoxo,

Alice

Help, I have rust on my quilt!

I basted this quilt few weeks ago, I tried to quilt it with a normal sewing foot and it wasn’t great. So, I waited to have enough money to buy a walking foot. When I did, I wanted to have a go at this quilt again but realised (to my horror) that I had rust stains!!!

IMG_8805

What is surprising though, is that I have stains only on the white fabric (it is a bleached calico). As soon as I discovered this, I removed the safety pins and threw them away.

IMG_8806

My question to you is: have you ever come across this problem? Do you know what to do?

My first instinct was to Google it and I found out that lemon and salt could remove rust stains. I’ve tried it last week-end and unfortunately it didn’t help.

IMG_8807

If you have any other tips, please let me know. My colleague says: unpick it! What would you do?

Meadow brick quilt top

Last week, I bought a new machine, eeeek! It’s a Janome 6030, it is my first computerised machine and Oh Boy, I love it!

I had to start a new project over the week-end to celebrate my new machine. I picked my Meadow fat quarter bundle (from Leah Duncan), added a wonky stripy grey and started cutting. I already had an idea on what to do with this beautiful bundle. As some of the prints are quite big, I didn’t want to lose all the prettiness by cutting them too small. Instead, I opted for a very simple quilt design who will allow the fabric to shine by themselves.

IMG_8810

This is how I came up with the brick wall quilt idea. I had a look around to see how other people were making this type of quilt and I really like Rachel’s version (blogging at Stitched in Color). She did a quilt-a-long back in 2010 with this design. Even if the pattern is pretty straight forward, I always find useful to read other’s people tutorials for inspiration. For example, I really like the way she explains how to cut the bricks to best utilise your fabric (cutting: fat quarters become bricks). After many toing and froing, I decided to cut my bricks slightly smaller than hers.

IMG_8815

In one evening of sewing, I put all the rows together. I was discovering my machine and I am now in love! I especially like the scissor button, it makes life so much easier.

IMG_8831

What also made life easier this time was to number the beginning of each row. I don’t know why I wasn’t doing it before, I was just making it more difficult for myself. It’s great when you chain piece as you might mix them up when you press them and also to know which side to add the next piece of fabric. IMG_8833

The next day, I continued sewing. I had to run twice to the local shop to buy more sashing (apparently, quilt maths isn’t my biggest strength).

IMG_8838

Towards the end of the afternoon, the quilt came together. I’m really not disappointed with my simple quilt design choice.

IMG_8837

The initial plan for quilting was to FMQ each bricks in a different design. I’m not too sure this is the best solution though, so I’m open to suggestions.

PS: linking up with:

WIP WedSew-Cute-Tuesday-e1384841858599

The Pinwheel star quilt

I’m glad to work through my pile of WIP (find the pin-wheel star WIP here). One of my friend noticed this quilt top and said to me: “if you finish it, I’ll buy it from you”. That’s a good motivation, right?

IMG_8743

As I mentioned on the WIP post, I wasn’t too sure how to quilt it. I was planing on doing straight quilting lines with my machine but as now the quilt is for sale and I’m not confident at quilting yet, I decided against this option.

My friend was willing to pay for a pretty quilting design, so I went to see my long arm quilter. I’m really keen to learn quilting but I love what a long arm quilter can do, so it will be hard for me to venture into my own quilting (especially on bigger piece). Once again, I wasn’t disappointed with the quilting result, I love this quilt so much with its added pretty texture.

When choosing the quilting design, I wanted to go for a “lace” look as the colour from the top are very subtle and delicate, I wanted to keep the same atmosphere. With the help of the long arm quilter, I picked a flower design. In my mind, it replicate well the design of lace. Quilting detail

I find the quilt so pretty, so delicate and feminine, I love it! Once again, it would be hard to let this quilt go, but I know it is going to a lovely family and would be loved.

IMG_8749

Here is the back:

IMG_8712I chose to go for a brighter pink for the binding to “lift” the quilt:

IMG_8765

This is the first time for me to add a label with my own name (I usually write the child’s name). As I meet more and more quilting people, they all insist on adding a label to quilts. I haven’t found the perfect solution yet but I like the handmade look this embroidered label gives. IMG_8772

PS: The city I live in at the moment (Wellington) is so windy. It is really hard to take picture of still quilts. More often than not, this is the picture result:

IMG_8707

Quilt Details
Finished Size: aprox. 50′ x 50′
Fabric: Fat quarter purchased in France + white calico
Backing: Soiree a Stonehill Collection by Donna Wilder + solid and stripy pink
Binding: Penelope by Holly Holderman for Lakehouse Dry Goods
Pieced by: Me
Quilted by: Long arm quilter (peonies for marcy by sweet dreams quilt studio)
 
Linking up with TGIFF and Crazy Mom Quilts